“The only difference between chaos and choreography is a 10-second cooldown.”
That line—from a squad-mate who mains Watchman—has been rattling around my head ever since I broke into Diamond tier. Farlight 84 looks like a turbocharged BR, but the teams that finish in the victory pod know three secrets: tempo management, coin compounding, and judicious spending. Below is the pattern that’s carried my trio to a 63 % win rate this split—plus the lone web page I visit when an event makes extra Diamonds worth the swipe.
1 Choose Your Hero for Map Control, Not Kill Highlights
Every lobby loves Mad-Megs and Phantom; I rotate heroes by zone:
| Map | Early-Circle Pick | Why It Matters |
|---|---|---|
| Desert Port | Watchman – instant sonar cone for warehouse angles | Wall-hack vision prevents the classic rooftop ambush. |
| Grassland | Ducksyde – jet-propelled shield | Hard counters ridge snipers; shield soaks one full magazine. |
| Polar Point | Ember – portable jump-pad | Extreme verticality lets you ping rooftops twice before boost drain. |
Choosing utility over raw DPS keeps momentum high without relying on perfect aim.
2 Coin Compounding Starts in the First 30 Seconds
Landing near an upgrade shop is bait if you can’t afford anything. My squad hits a Tier-2 loot cabin first, cracks two yellow crates (≈ 100 coins each), then beelines for the shop. The buy order:
- Jetpack Cooldown I – 80 coins
- Regen Armor I – 120 coins
- Primary Ammo I – 60 coins
Those three perks cost 260 coins—exactly the haul from two yellow crates plus pocket change—and translate into longer survivability before hitting that contested Spider Tank.
3 Heat Gauge = Second Health Bar
Most deaths happen with an empty jet-meter. Adopt the 50 % Rule:
- Escape Boost — never drop below 50 % heat unless you’re taking high ground.
- Offensive Boost — burst twice, pause, burst once; lands you on a roof with 30 % reserve instead of zero.
Heat-smart movement cut my average incoming damage per fight by 19 % over a ten-match sample.
4 Vehicles Aren’t Just Transport—They’re Mid-Game Econ Engines
Looting on foot yields about 6 chests per minute; hopping a Hoverbike pushes that to 10+. Each chest averages 50 coins, so the bike nets 200 extra coins every minute you stay mobile. That’s a purple weapon mod without firing a shot.
5 Blueprint for Mid-Game Pushes
- Minute 5–7 – Secure a vehicle and sweep outskirts for coins.
- Minute 7–10 – Spend > 500 coins on ability cooldowns and weapon mods.
- Minute 10+ – Ditch the vehicle before the penultimate circle; it turns into a rocket magnet.
Following that script, we enter final circles with full purple kits 80 % of the time.
6 Diamonds: Spend Only on Multipliers
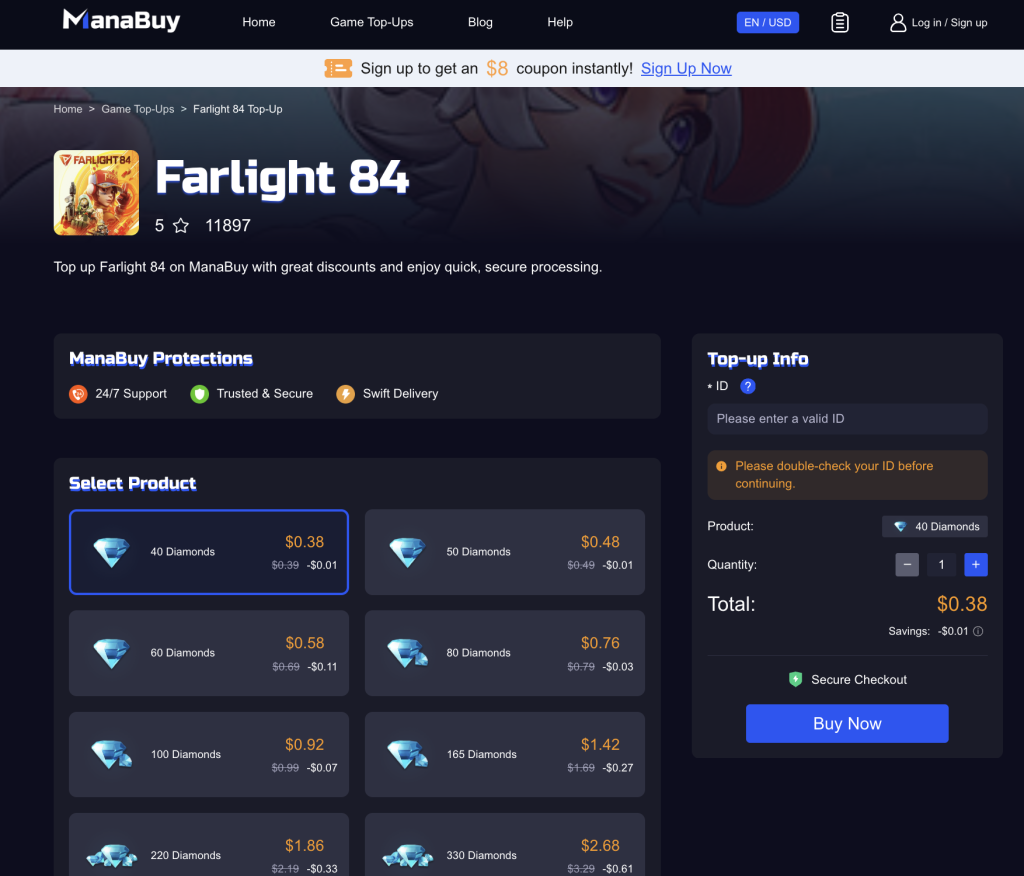
Limited skins are fun, but only two shop items influence MMR: Advanced Hero Pass (more Reactor Cores) and the occasional double-loot event ticket. When one of these rotates in and my stack is light, I reload through the Farlight 84 cheap Diamond recharge.
- Tax is included—no surprise markup.
- Delivery takes about 60 seconds, recognized as an official purchase (first-buy doubles still apply).
- Current sweet-spot bundle: 1 350 Diamonds for ~10 % less than the in-client price.
I hit that link, grab a single bundle, and close the tab—no drip-feeding small buys that get hammered by platform fees.
7 Post-Game Review in Two Questions
- Did we burn heat below 30 % before the last fight? If yes, adjust boost rhythm.
- Did we hold ≥ 400 coins past minute 9? If yes, we were hoarding—spend earlier on cooldowns.
Answering those after every match tightens habits faster than any aim drill.
Takeaways in One Scroll
- Pick heroes for scan, shield, or jump-pad—frag power comes later.
- Break two yellow crates, hit the shop immediately.
- Keep jet heat above half unless you’re finishing a fight.
- Use vehicles to print coins, then abandon before they explode.
- Only buy Diamonds when it multiplies resources—via Manabuy to dodge store tax.
Run that loop for a week. The season badge climbs, the heat gauge stops bottoming out, and your wallet notices you’re top-up smart, not top-up hungry.